An AI conveyor belt in NVIDIA Isaac Sim - Part 1 (Conveyor physics)
Introduction
I have tinkered with a lot of CAD tools, simulation environments, AI tools etc., and NVIDIA Isaac Sim is incredible. I have been working through the tutorials and I am now embarking on building something interesting and challenging.
This is the first part of a series on how to (hopefully) build a robot picker arm that can discern objects using computer vision and pick them and place them in the correct destination.
The goals of this experiment are:
- Use Isaac Sim for a non-trivial project to learn more about its capabilities.
- Use the synthetic data generation capabilities to train a ML model to identify specific objects.
- Use the simulation environment to program a robot arm to pick and place specific objects.
If you’ve ever played the amazing game Factorio you will be familiar with a filtered inserter:
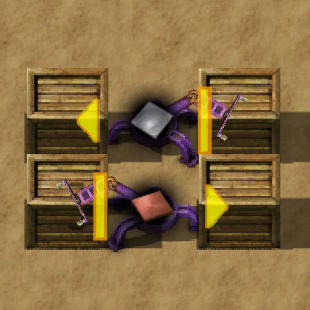
This is basically what I’m trying to achieve. There will be a conveyor belt with objects that are moving along on it, and a couple of robot arms that have cameras to identify objects and they pick specific objects and sort them into their respective containers.
The conveyor belt
Let’s be clear, Isaac Sim is complex. It is very powerful but it is complex to understand because it brings together multiple layers - rendering, object creation, simulation, scripting etc. There are also multiple ways of doing things, especially when scripting via Python. On the Python side for example there are multiple workflows:
- Running scripts within the application itself with a rudimentary script editor.
- Running the entire app from a standalone script.
- Connecting a Jupyter Notebook to the application.
- Adding your own examples to the existing body of Python examples.
For a iterative development process I thought the Jupyter notebook approach would be the best approach, but either the synchronisation is not robust or I’m doing something wrong as I found it to be unreliable.
The internal rudimentary editor is fine for quickly testing something but lacks features.
The standalone workflow is way too slow for iterative development as the app startup time is prohibitive.
Which leaves the “add you own example” approach which I’m currently using. It is slightly cumbersome as editing the code means you have to click a few buttons to load the new script, but it works for now.
What I tried initially was to try and build a conveyor belt that uses a belt around two cylindrical motors, but this turned out to be pretty complex mechanically and unnecessary for the goals of this experiment.
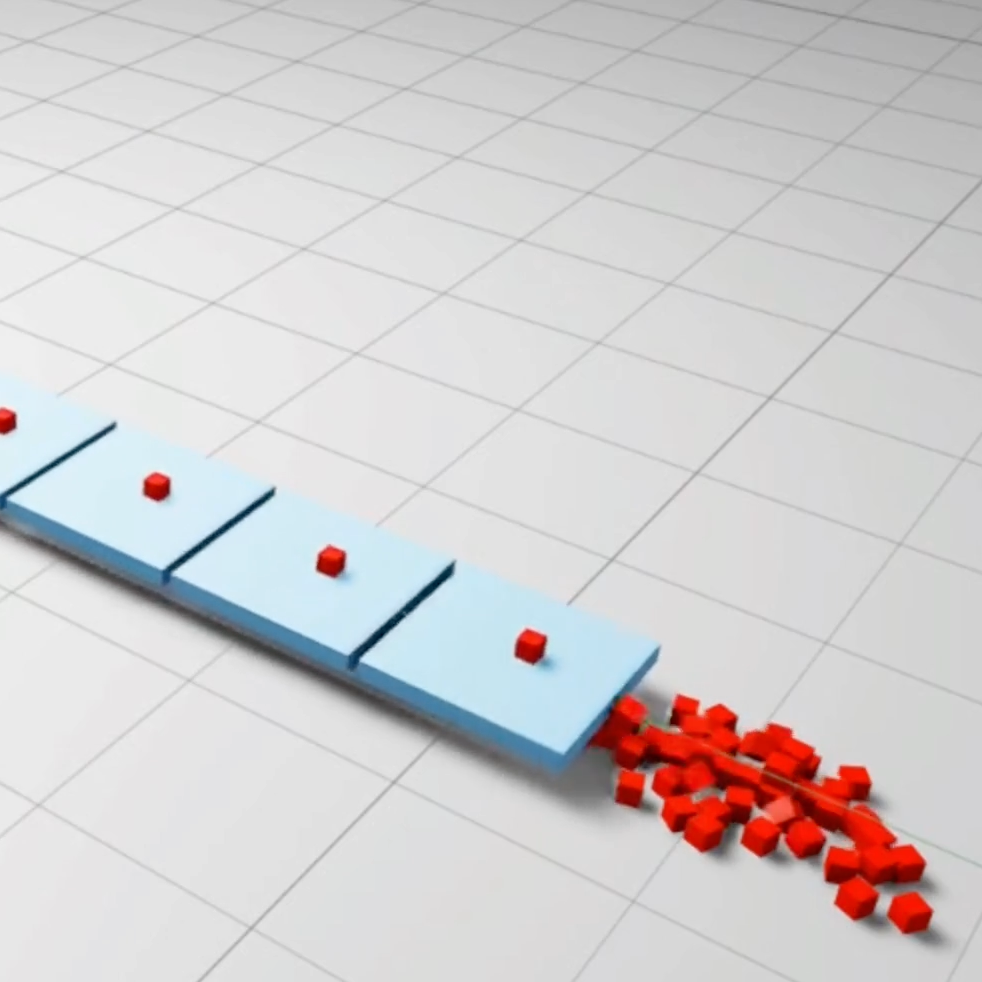
So what I have implemented is a conveyor belt that can’t exist in reality as it levitates in space but it serves my purposes:
The implementation
The conveyor is implemented as follows:
- A “wall” cuboid that’s hidden which serves as an anchor for the prismatic joint.
- N conveyor “plates”.
- Each conveyor “plate” has a prismatic joint to the hidden “wall”
- The prismatic joint has a linear drive with a velocity target.
- A callback on each simulation step that examines the world “pose” of each “plate”, if it exceeds the length of the belt it is moved to the beginning.
- On each plate reset a cuboid is dropped onto the conveyor.
The best place I found for examples of doing physics using Python in Isaac Sim is from the menu:
Window → Physics → Demo Scenes
However, this code is based on the low-level Pixar Universal Scene Description (USD) Python primitives, whereas a lot of Isaac Sim example code uses the higher-level Omniverse API. This is a bit confusing and I’m still figuring this out. You will see below there’s a mix of primitive code (imported from “pxr”) and ominverse code (imported from “omni.*”).
I will list snippets below but the full code is here. The documentation for creating your own Isaac Sim extension is here.
Wall
The wall object is a hidden cuboid, and it it set in place (i.e. it doesn’t drop with gravity), so it is not defined as a rigid body and doesn’t have collision properties:
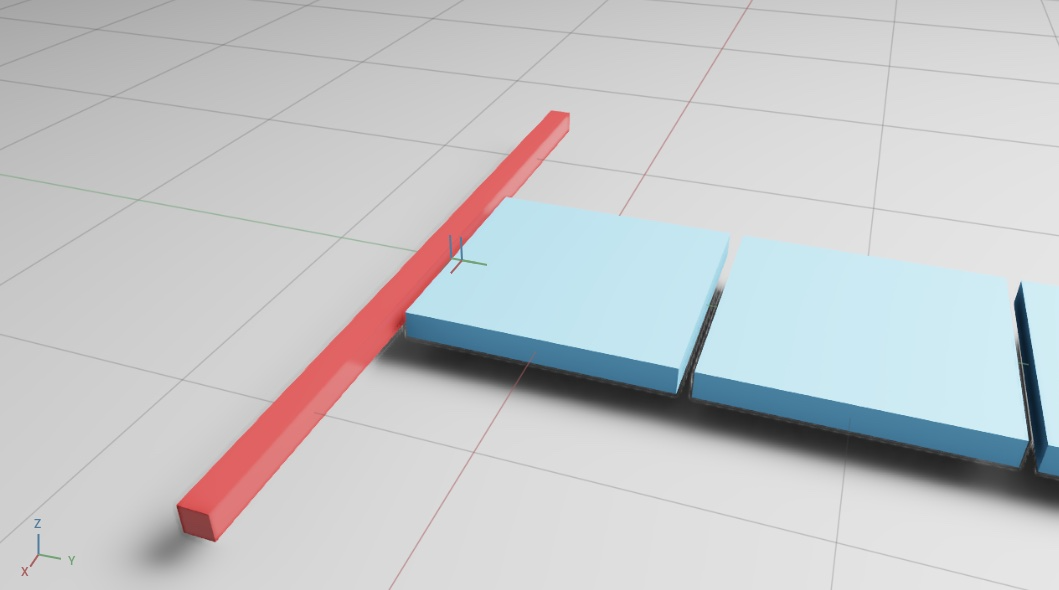
As mentioned above the wall is created using the low-level USD Python code (“pxr” package). Orientation is defined using quaternions etc.
1
2
3
4
5
6
7
8
9
10
11
12
13
14
15
16
17
18
19
20
21
22
23
24
25
26
27
28
29
30
31
32
from pxr import UsdGeom, Gf

def create_wall(stage, size, gap):
    wallPath = "/World/wall"

    position = Gf.Vec3f(
    	0.0,
    	-size/2 - gap - size / 10 / 2,
    	0.0)
    orientation = Gf.Quatf(1.0)
    color = Gf.Vec3f(
    	165.0 / 255.0,
    	21.0 / 255.0,
    	21.0 / 255.0)
    size = 100.0
    scale = Gf.Vec3f(3.0, 0.1, 0.1)

    cubeGeom = UsdGeom.Cube.Define(stage, wallPath)
    cubePrim = stage.GetPrimAtPath(wallPath)
    cubeGeom.CreateSizeAttr(size)
    half_extent = size / 2
    cubeGeom.CreateExtentAttr([
    	(-half_extent, -half_extent, -half_extent),
    	(half_extent, half_extent, half_extent)])
    cubeGeom.AddTranslateOp().Set(position)
    cubeGeom.AddOrientOp().Set(orientation)
    cubeGeom.AddScaleOp().Set(scale)
    cubeGeom.CreateDisplayColorAttr().Set([color])

    visAttr = cubePrim.GetAttribute("visibility")
    visAttr.Set("invisible")
    return cubePrim
Plates
The plates are created with the high-level Omniverse API, where “DynamicCuboid” creates a cuboid with collision and rigid body properties already added.
Note how the Omniverse API was used numpy primitives as to define sizes and orientations, but the USD API for joints and drives. Each plate has a prismatic joint to the wall with a linear driver that has a target velocity. I think there’s a higher-level “Articulation API” in Isaac SIM, it might be better to use that for the joints. Something to look into.
1
2
3
4
5
6
7
8
9
10
11
12
13
14
15
16
17
18
19
20
21
22
23
24
25
26
27
28
29
30
31
32
33
34
35
36
37
38
39
40
41
42
43
44
from pxr import UsdGeom, Gf
from omni.isaac.core.objects import DynamicCuboid
import numpy as np

def create_conveyor_plate(world, stage, size, gap, index):
    platePath = f"/World/plate_{index}"

    plate = DynamicCuboid(
        prim_path=platePath,
        name=f"plate_{index}",
        position=np.array([0, (index) * (size + gap), 0.0]),
        size=np.array([size, size, 10.0]),
        color=np.array([71.0 / 255.0, 165.0 / 255.0, 1.0])
    )
    world.scene.add(plate)

    # prismatic joint
    jointPath = f"/World/prismaticJoint_{index}"
    prismaticJoint = UsdPhysics.PrismaticJoint.Define(
    	stage, jointPath)
    prismaticJoint.CreateAxisAttr("Y")
    prismaticJoint.CreateBody0Rel().SetTargets(
    	["/World/wall"])
    prismaticJoint.CreateBody1Rel().SetTargets(
    	[platePath])
    prismaticJoint.CreateLocalPos0Attr().Set(
    	Gf.Vec3f(0.0, size/2 + gap, 0.0))
    prismaticJoint.CreateLocalRot0Attr().Set(
    	Gf.Quatf(1.0))
    prismaticJoint.CreateLocalPos1Attr().Set(
    	Gf.Vec3f(0.0, -0.5, 0.0))
    prismaticJoint.CreateLocalRot1Attr().Set(
    	Gf.Quatf(1.0))

    # add linear drive
    linearDriveAPI = UsdPhysics.DriveAPI.Apply(
    	stage.GetPrimAtPath(jointPath), "linear")
    linearDriveAPI.CreateTypeAttr("force")
    linearDriveAPI.CreateMaxForceAttr(1000)
    linearDriveAPI.CreateTargetVelocityAttr(100.0)
    linearDriveAPI.CreateDampingAttr(1e10)
    linearDriveAPI.CreateStiffnessAttr(0)

    return plate
I have used the Isaac Sim editor to debug joint positions etc., as I have found them to be a bit counter-intuitive.
The simulation step
During each simulation step:
- The plates are examined and reset to the start if they exceed the conveyor belt length.
- A cuboid is dropped onto the plate.
1
2
3
4
5
6
7
8
9
10
11
12
13
14
15
16
def sim_step_callback(self, step_size):
    for plate in self._plates:
        position, _ = plate.get_world_pose()
        if position[1] > self._max_plate_position:
            position[1] -= self._max_plate_position
            plate.set_world_pose(position)
            path = f"/World/widget_{self._widget_index}"
            cube = DynamicCuboid(
                prim_path=path,
                name=f"widget_{self._widget_index}",
                position=np.array([0, 50, 100]),
                size=np.array([10, 10, 10]),
                color=np.array([1.0, 0.0, 0.0])
            )
            self.get_world().scene.add(cube)
            self._widget_index += 1
Conclusion
This is the first experiment I’ve implemented in Isaac Sim so things are a bit rough but they work. The APIs are powerful but complex and I expect to find out better ways of doing things.
The next step is to use the synthetic data generation capabilities of Isaac Sim to generate images to train computer vision models. The goal is to identify classes of objects from the conveyor belt regardless of orientation, size etc.
The full code is here.
You can follow me on Twitter here.